- WAITING ROOM: When they call your number, answer “はい” and follow.
- CROSSING STREET: Look both ways before crossing the street. ONLY walk on the green part.
- NOTE: WHICH LANE you start at (1, 2 or 3) which is where you will END at, and pull up to the farthest pole if there isn’t a car ahead of you when you finish.
- CAR: If you are first, wait for everyone to get in the car, inspect everywhere starting from the back, passenger side, check for traffic before stepping in front of the car, including under the car, glance at the driver’s side, check for traffic again, and open the door to get in the car with BOTH HANDS, traffic check, shut the door with BOTH HANDS.
- PAPERS: Hand them papers with “よろしくおねがいします”.
- CHECK:
- LOCK DOOR
- ADJUST SEAT
- ADJUST MIRRORS: TOUCH CENTER – LEFT – RIGHT. LOOK AT EACH MIRROR FOR 3 SECONDS
- SEATBELT
- (Possible brownie points: Ask “シートベルトだいじょうぶですか” to everyone in the car. )
- (Extra brownie points: Ask if you can start, “はじめてもいいですか” )
- RIGHT HAND ON WHEEL
- FOOT ON BRAKE
- CAR IN DRIVE
- E-BRAKE OFF
- CENTER – RIGHT MIRROR, BLINKER, SHOULDER. Physically turn head almost to where you can see the backseat passenger.
- START: Announce, “はい。はじめます。” Pull out.
- FIRST TURN: CENTER – RIGHT MIRROR, BLINKER, get as close to the right side as possible. Slow. KAKUNIN LEFT/RIGHT, SHOULDER, and turn.
- OBSTACLE: Go about 15km
- BEFORE obstacle: CENTER – RIGHT MIRROR, BLINKER, SHOULDER, move right, drive with center line going through the car.
- Immediately after moving right: CENTER – LEFT MIRROR, BLINKER, SHOULDER, merge left. Start this quickly and smoothly.
- AFTER obstacle, pick up speed to about 25-30km.
- CURVE: ALL CURVES SLOW DOWN BEFORE, THEN MAX 15KM. SMOOTH.
- INTERSECTION: Keep an eye out for the intersection right before the next curve, let off the gas, KAKUNIN RIGHT, LEFT, go.
- CURVE: SLOW DOWN to about 15km, then let off the brake and idle through the curve.
- 50KPH PART: When they tell you to, immediately press on gas until 48kph and immediately let off (so you just barely hit the minimum speed while giving yourself a buffer in case the speed goes up a notch or two)
- BRAKE X3: Immediately slow down, pushing brakes 3 times: softly, then a bit more, then a bit more than the last.
- CURVE: CENTER – RIGHT MIRROR, BLINKER, turn 15km – This is the only time you will use your blinker before a curve because, for some reason, they always want you to indicate at least 30m before an actual turn. This curve happens within 30m of the next turn, so that’s why you’re going to indicate before the curve. Otherwise you NEVER need to use the blinker for regular curves.
- TURN RIGHT: LOOK RIGHT, move right, SHOULDER, *DON’T STOP* then turn and end up in the far-left lane
- SPEED: Go about 30km.
- STOPLIGHT: Yellow/Red: STOP SMOOTHLY before limit line, Green: let off gas, KAKUNIN RIGHT, LEFT, GO.
- After stoplight, before BUSH: CENTER – RIGHT MIRROR, BLINKER, SHOULDER, turn right at the giant bush. Blinker still on.
- RIGHT TURN: CENTER – RIGHT MIRROR, BLINKER, SHOULDER. Turn right again, enter crank.
- CRANK: idle through, NEVER stop. Keep 5kph or under. At the end: CENTER – RIGHT MIRROR, BLINKER, STOP. KAKUNIN LEFT, RIGHT, SHOULDER, turn right out of the crank.
- CENTER – LEFT MIRROR, BLINKER, SHOULDER. Immediately turn left into S-curve.
- S-CURVE: Idle through again, 5kph or under, NEVER stop. Once you reach the end of it, CENTER – RIGHT MIRROR, BLINKER and keep it on (it will reset as you turn but it’s fine). STOP. KAKUNIN LEFT, RIGHT. SHOULDER. Turn.
- LISTEN for directions:
- LEFT turn (ひだりへむがって) = go back to start. That’s a fail

- RIGHT turn(みぎへむがって) = keep going. There’s still hope!
- LEFT turn (ひだりへむがって) = go back to start. That’s a fail
- STOPLIGHT: CENTER – RIGHT MIRROR, BLINKER. Hug the right line. Green: KAKUNIN LEFT, RIGHT, SHOULDER, turn.
- BUSH AGAIN: let off gas, LOOK LEFT, RIGHT before crossing through, go straight. This is the blind intersection. Be careful.
- STOP SIGN: Just after passing the bush, CENTER – LEFT MIRROR, BLINKER, MOVE LEFT. Continue to stop sign, stop smoothly before the limit line. KAKUNIN RIGHT, LEFT. Pull up slowly, SHOULDER, KAKUNIN RIGHT AGAIN, turn.
- CURVE: Last curve, 15km
- LEFT TURN: Just after the curve, CENTER – LEFT MIRROR, BLINKER. Move left, SHOULDER. Turn left at “B”.
- STOPLIGHT: Just after left turn, CENTER – RIGHT MIRROR, BLINKER. KAKUNIN LEFT, RIGHT, SHOULDER. Turn right at the light when green.
- TURN RIGHT: Just after light, CENTER – RIGHT MIRROR, BLINKER. Move right. SHOULDER, turn right into the correct numbered lane (1, 2, or 3).
- FINISH: CENTER – LEFT MIRROR, BLINKER, pull over to left, hug the curb. STOP when the pole is aligned with the front of the hood. Keep the blinker on.
- E-BRAKE ON
- CAR IN PARK
- FOOT OFF PEDAL
- Leave blinker on with both hands on the wheel and WAIT.
- PAPERS: They will hand your papers over. If advice is given, reply “はい。ありがとうございます!” Otherwise, if they say “おつかれさまでした” then you ariGETTO out of there—politely. Carefully.
- SEATBELT OFF
- UNLOCK DOOR, RIGHT MIRROR.
- DOOR: Open door with BOTH HANDS slightly, SHOULDER. Get out, CLOSE DOOR with BOTH HANDS.

Driving test guide

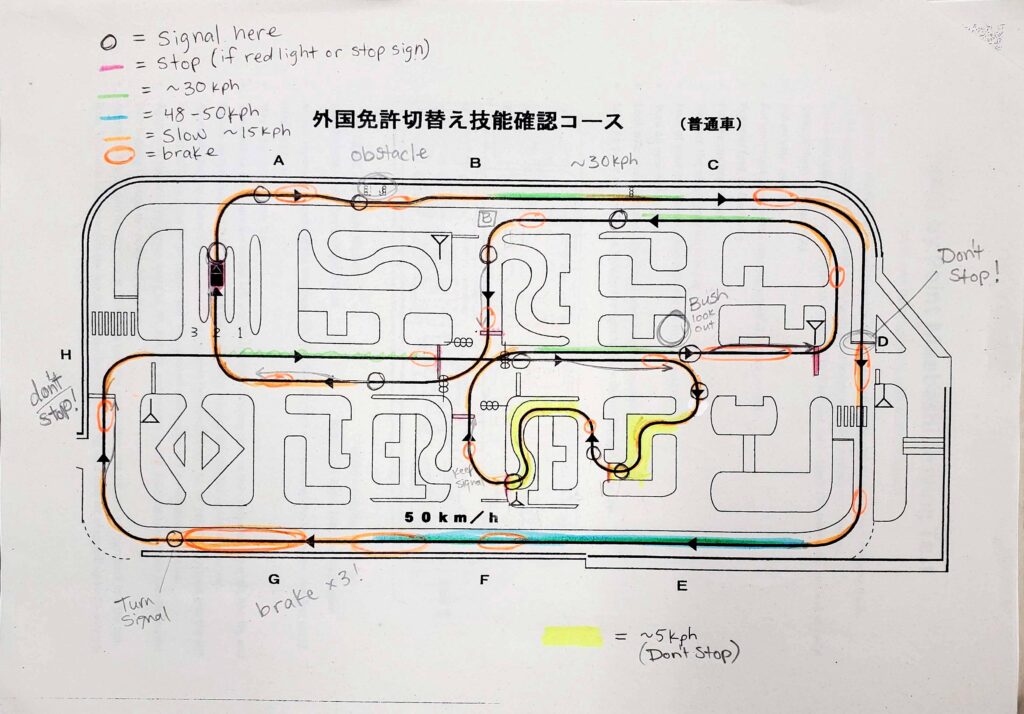
Dianne’s annotated guide to the driving course

pssst also you can see the entire course from Google Maps

Example of papers that prove you went to driving school.

More driving school papers, these ones are stamped.
